Before this, Read : Introduction to webview app
Now Lets start creating the webview app to convert the website to an android app.
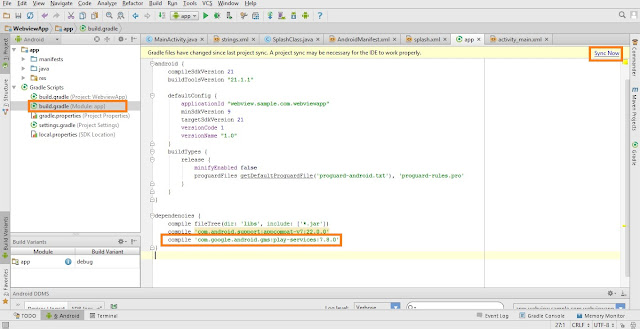
After creating a new project, Select build.gradle (Module:app) from the project tree. And add the below line in the dependencies section.
compile 'com.google.android.gms:play-services:7.8.0'
Now Select MainActivity.java and Delete all the code Except the first line. That is your app package name. In my case it is

Now Lets start creating the webview app to convert the website to an android app.
After creating a new project, Select build.gradle (Module:app) from the project tree. And add the below line in the dependencies section.
compile 'com.google.android.gms:play-services:7.8.0'
After adding the line, Gradle may ask you to Sync the new dependency. Click on Sync Now if asked. and wait for the synchronization process to complete.

Now Select MainActivity.java and Delete all the code Except the first line. That is your app package name. In my case it is
package webview.sample.com.webviewapp;
Copy the below code and paste it in your MainActivity.java below the package name.

After that, In Line 39, Change the Url with the website you want to use in the app. That is
mWebView.loadUrl("http://sh.st/bDVX5");
Change the URL after http://
Now, Open activity_main.xml , Delete the whole code and paste the below code in it.

To be Continued.
Read: Create your Webview App : Part 2
mWebView.loadUrl("http://sh.st/bDVX5");
Change the URL after http://
Now, Open activity_main.xml , Delete the whole code and paste the below code in it.

To be Continued.
Read: Create your Webview App : Part 2
0 comments:
Post a Comment