Before this, Read : Introduction to Webview app
After Installation, open android studio. You will see a screen like below screenshot. Select 'Start a new Android Studio Project'. if you are already a Android Studio user. Select File>Close Project to see the below screen.


After Installation, open android studio. You will see a screen like below screenshot. Select 'Start a new Android Studio Project'. if you are already a Android Studio user. Select File>Close Project to see the below screen.

In the next screen, Fill the fields with Application name, Company Domain(Give anything) and Package name. Select the Location to save your project.
Usually C:\Users\User name\AndroidStudioProjects
Click next

In the next screen, you have to choose the platform you want to run your app. Tick only the Option Phone and Tablet. Now select Minimum SDK. Giving API 9: Android 2.3(Gingerbread) will allow you to run your app in all devices which have android versions after Gingerbread.
Click next

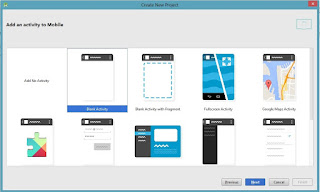
In the next screen you have to choose an activity for your app. Select Blank Activity and Click Next

You have to enter the attributes of your activity in the next screen. Do not delete or write anything new to the columns. Leave all the columns as it is.
Click Finish

Now wait for the Build process to Complete. After it is complete, you will see a screen like this.

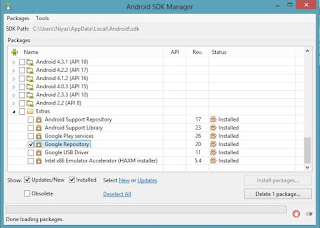
Now Go to SDK Manager as given in the above screenshot. Now you can see Android SDK Manager Window. Scroll down to the bottom and Under the Extras Category Make sure Google Repository is installed. if not, Untick all the other columns, Tick the Google repository and click Install Packages. After that Select Accept and click Install.

Now the Setup Phase is Complete, Lets Proceed to Next Step
Next Read : Creating your Webview App : Part 1
Next Read : Creating your Webview App : Part 1
0 comments:
Post a Comment